SkiErg
Also called ski erg, ski ergometer.
What is a SkiErg?
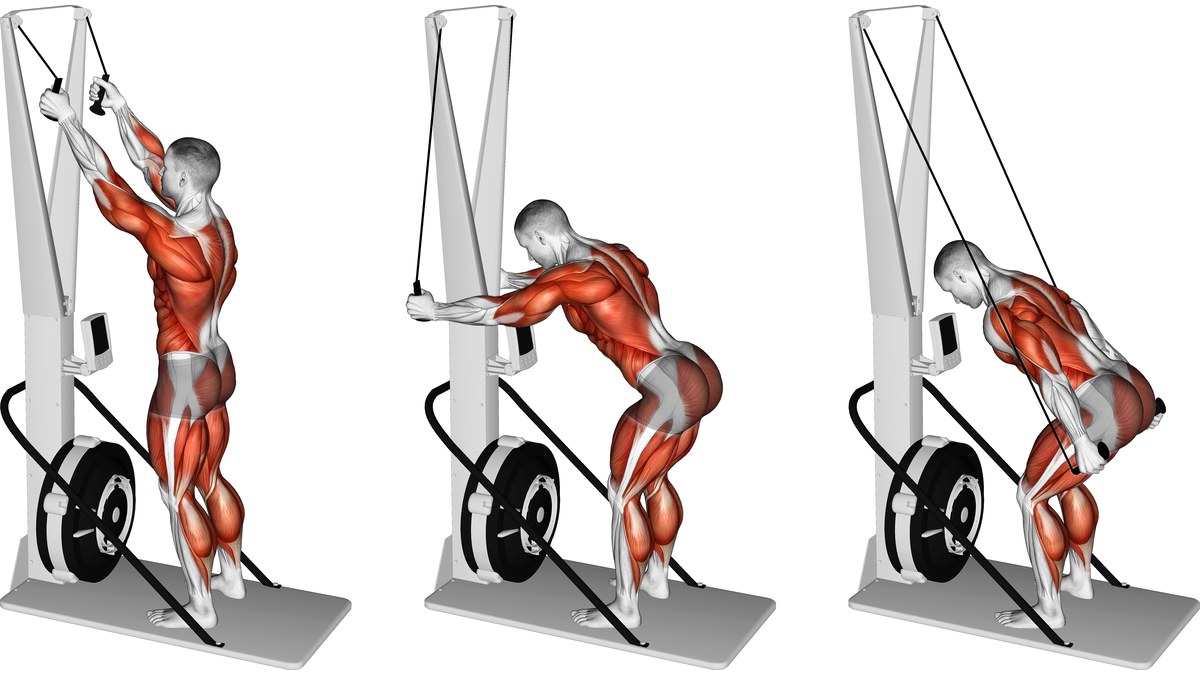
A SkiErg is a standing cardio machine with two overhead handles connected by cords to a flywheel. In the double-pole version, you pull both handles down together as your torso tips forward and your knees bend, then stand back up as the handles return. It combines work from the back, abdomen, arms and legs rather than being an arm-only cable pull.
How do you use a SkiErg?
Set up
- Check that the machine is secure and its cords are clear, then face it with your feet about shoulder width apart on a stable surface.
- Take one handle in each hand, keeping the cords separate. Stand tall with your hands just above eye level, elbows bent and wrists in line with your forearms.
Execution
- Start both handles downward together by tightening your abdomen and tipping your torso forward from your hips. Let your knees bend as the pull develops.
- Continue toward the sides of your thighs, allowing your arms to lengthen without snapping your elbows straight. Finish with your hips back and knees softly bent.
- Stand back up as you guide both handles to the starting height. Keep hold as the cords rewind, then repeat the same pull and return.
- When you finish, bring the handles all the way back to their resting position at the top before letting go. Do not release them while the cords are pulled out.
Common mistakes
Pulling only with the arms
Keeping the torso and legs rigid turns the double-pole action into a separate arm exercise. Let the forward body movement lead, then continue the handles down toward your thighs.
Dropping into a deep squat on every stroke
For the basic version, move your hips back and bend the knees enough to accompany the pull. You do not need to sit low before standing up again.
Letting go at the bottom
The cords retract toward the machine. Guide the handles back to the top before releasing them, rather than letting them fly upward.
Where it fits in a session
Use the SkiErg in the part of the session your plan assigns to it.
Choose pace, duration and machine settings for that session. The technique steps explain the machine and stroke without selecting a workout.
Muscles worked
Primary
Secondary
- None listed in this guide
Schematic surface view. Some muscles are partly visible or not shown.
The back, abdomen and arms contribute to the downward pull, while the hips and knees bend and straighten through the cycle. These muscles are listed together to describe a coordinated cardio movement, not to rank their activity or suggest that it isolates one muscle.
Variations
- Alternating-arm SkiErg — One handle moves down while the other returns, instead of pulling both together. This changes the coordination from the double-pole version taught here.
- Seated SkiErg — Uses a stable seated setup and reduces the standing leg contribution. Seat position and handle reach need to suit that setup.
Frequently asked questions
What muscles does a SkiErg work?
The latissimus dorsi helps bring the upper arms down, the abdominal muscles contribute to the forward trunk action, and the triceps help straighten the arms toward the finish. The gluteus maximus and quadriceps help straighten the hips and knees on the return. This describes their roles, not a measured ranking of which muscle works hardest.
Should I squat while using a SkiErg?
The basic double-pole stroke uses a forward hip hinge with some knee bend. A deep squat is not required. Let the knees bend with the pull and straighten again as you stand, rather than turning each stroke into a full squat.
Should my arms stay straight throughout the pull?
Start with bent elbows and let the arms lengthen as the handles approach your thighs. Avoid fixing the elbows straight for the entire stroke or snapping them into a hard lock at the finish. Keep the wrists aligned with the forearms.
Which damper setting should I use?
The damper changes airflow to the flywheel and how the stroke feels. How hard you pull also matters; a higher number is not simply a better workout. Choose a setting that fits your planned session and lets you keep the pull and return controlled.
How do I stop and put the handles back?
Finish the pull, stand up and accompany the handles back to their top resting position. Release them there with the cords retracted. Do not drop the handles while they are down by your thighs.
Sources
- Betts JG, et al. Anatomy and Physiology 2e, 11.4: Axial Muscles of the Abdominal Wall, and Thorax. OpenStax. https://openstax.org/books/anatomy-and-physiology-2e/pages/11-4-axial-muscles-of-the-abdominal-wall-and-thorax
- Betts JG, et al. Anatomy and Physiology 2e, 11.5: Muscles of the Pectoral Girdle and Upper Limbs. OpenStax. https://openstax.org/books/anatomy-and-physiology-2e/pages/11-5-muscles-of-the-pectoral-girdle-and-upper-limbs
- Betts JG, et al. Anatomy and Physiology 2e, 11.6: Appendicular Muscles of the Pelvic Girdle and Lower Limbs. OpenStax. https://openstax.org/books/anatomy-and-physiology-2e/pages/11-6-appendicular-muscles-of-the-pelvic-girdle-and-lower-limbs